The layout of trenches during the WWI was carefully designed to maximise defence and minimise the impact of enemy fire. Understanding the structure of these trenches provides insight into the daily lives of soldiers and the strategic considerations of trench warfare. This page goes through the key components of trench layouts and their evolution throughout the war.
Basic Trench Layout
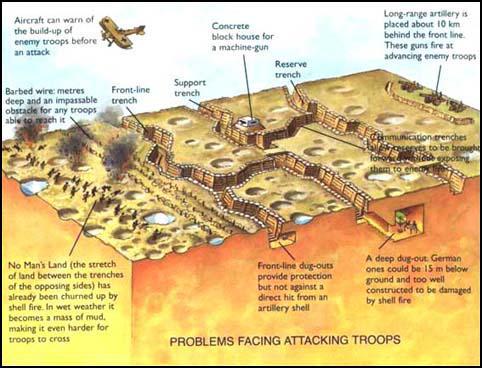
Initially, trenches were relatively simple, consisting of a front-line trench, a support trench, and a reserve trench. The front-line trench was closest to the enemy and housed the soldiers who faced direct combat. Behind it were the support trenches, which provided additional troops and supplies. The reserve trench was located further back and served as a staging area for reinforcements and supplies.
Key Components of Trench Layouts
As trench warfare evolved, so did the complexity of trench designs. Key components included:
- Fire Step: A raised area in the trench that allowed soldiers to fire their weapons over the parapet.
- Parapet: The front-facing wall of the trench, often reinforced with sandbags, which protected soldiers from enemy fire.
- Dugout: A small area dug into the side of the trench where front-line soldiers could rest.
- Communication Trenches: Trenches that connected the front line, support, and reserve trenches, facilitating movement and communication.
- Duckboards: Wooden planks laid on the trench floor to keep soldiers' feet out of the mud.

Improvements Over Time
Over time, trench designs were improved to address the challenges faced by soldiers. Innovations included deeper and wider trenches, better drainage systems, and reinforced walls. These improvements aimed to reduce the impact of artillery bombardments and improve the living conditions of soldiers.
Advanced features such as dugouts for sleeping and shelters for command posts were introduced to make trench life more bearable. However, the constant need for adaptation meant that trenches remained a harsh and dangerous environment throughout the war.
Conclusion
The layout of trenches was a crucial aspect of First World War combat strategy. The design evolved to meet the demands of prolonged conflict and changing tactics. By understanding the layout and components of trenches, we gain a deeper appreciation for the challenges faced by soldiers and the strategic considerations of trench warfare.